DIY Wood Slice Christmas Ornaments

Christmas is in two and a half very short weeks. Is your tree ready?

I have a synthetic tree, so mine has been up and ready for just over two weeks now. One of my favorite things about Christmas is decorating my tree. I love finding the perfect spot for each and every ornament. 

This year I decided to switch up the theme of my tree. My focus for this years ornaments was to stick with very natural, bohemian vibes. There will be lots of earthy tones with plenty of things that are actually found in nature; pine cones, wood chips, moss and more. 

Since I decided to switch things up this year, I decided to include you all part in this process by showing you all of the fun, DIY ornaments I’ve been making this season! All of the ornaments I made take less than 30 minutes and most of the materials will be used more than once, making this a very affordable week of projects.

Stay tuned because every day this week I’ll be sharing with you an inexpensive, bohemian style, ornament tutorial! 
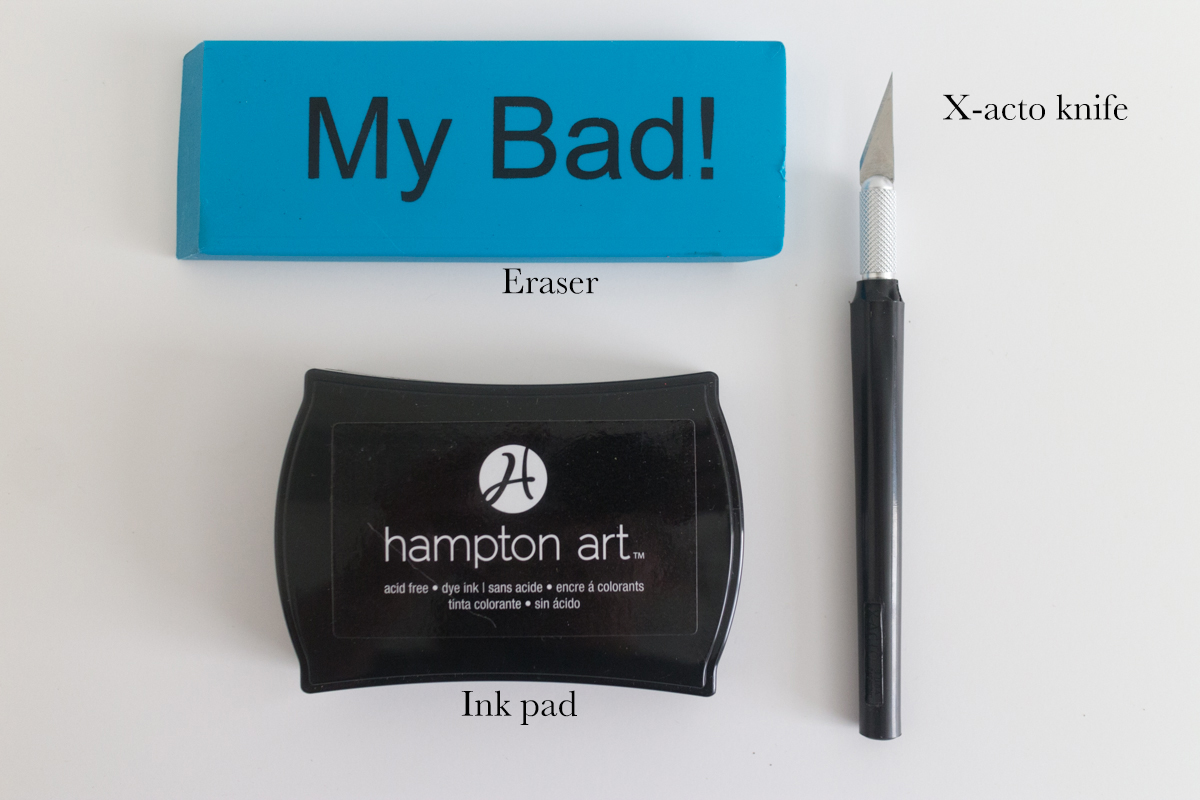
Supplies:

  • Stamps (find out how to make your own stamps here)
  • Ink pad
  • 1.5" birch chips (find them on Amazon by clicking here or find them at Michael's by clicking here)
  • Twine
  • Hot glue gun

Stamp the birch:

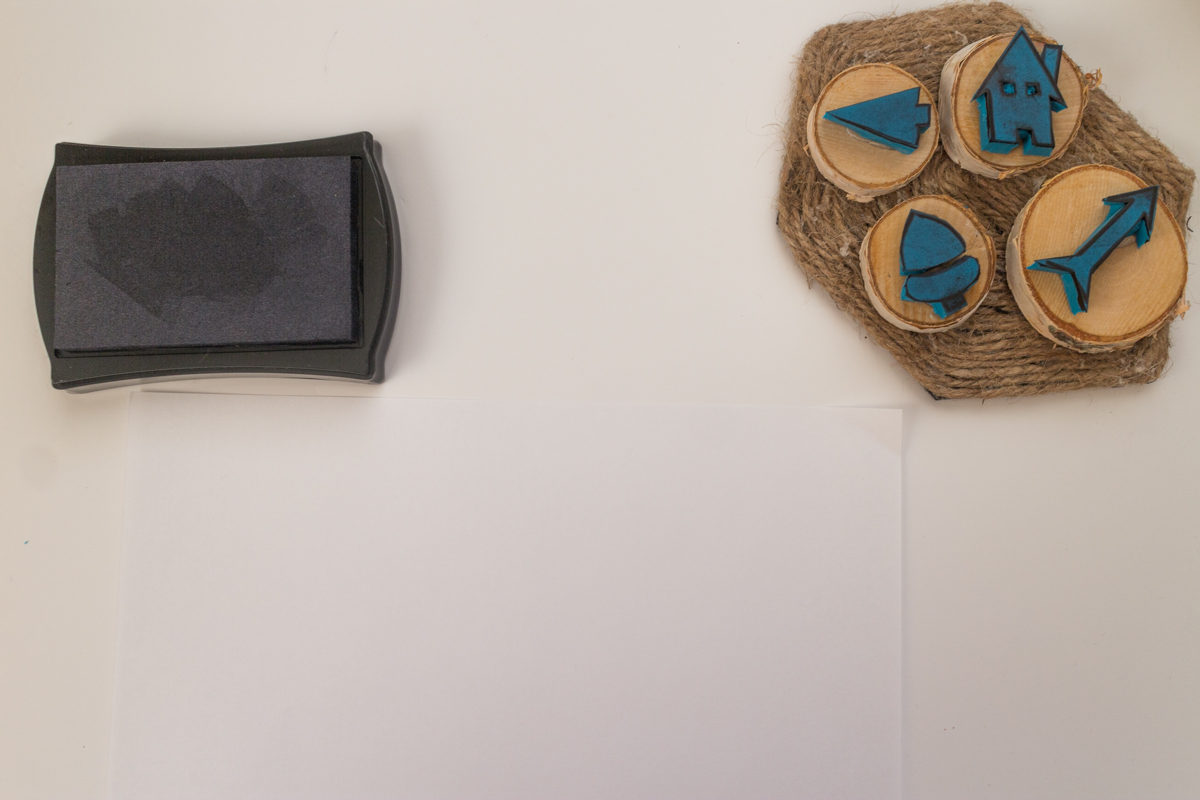
Coat your awesome handmade stamps that you learned how to create by clicking right here in ink from your ink pad. I used black but you can use any color that you want. Maybe even go for the typical red and green for a more festive feel!

If you have larger wood slabs, you can apply multiple/bigger stamps. I have a pretty small Christmas tree so I used smaller discs, they were all around 1.5 inches to be exact.

Knot the ornament:

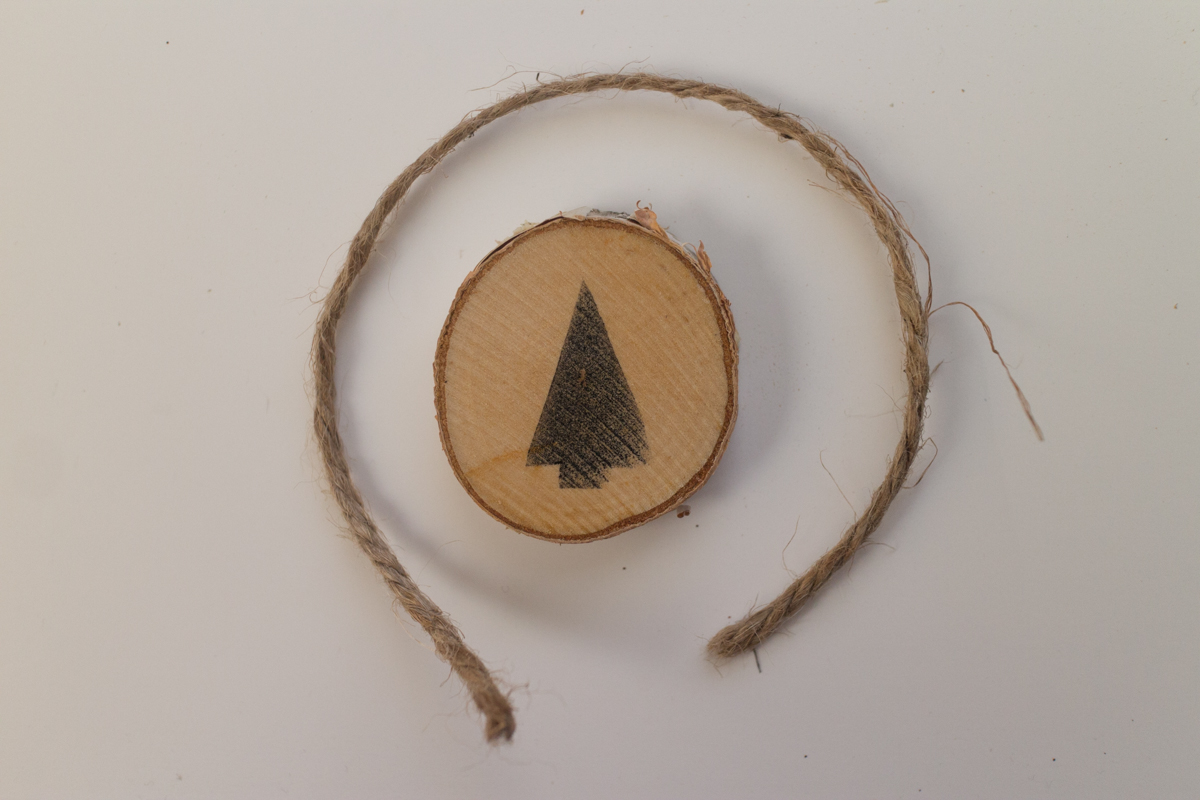
Cut a small piece of twine, around 5 inches. If you want a longer ornament or used bigger discs, you may want to cut your twine a little longer. 

Knot your twine by following the directions below.

Fold the twine in half so that both ends are between your fingers. 

Wrap the loose end of the twine around your index finger. 

Pull the loose ends through the back of the circle you just created on your finger. 

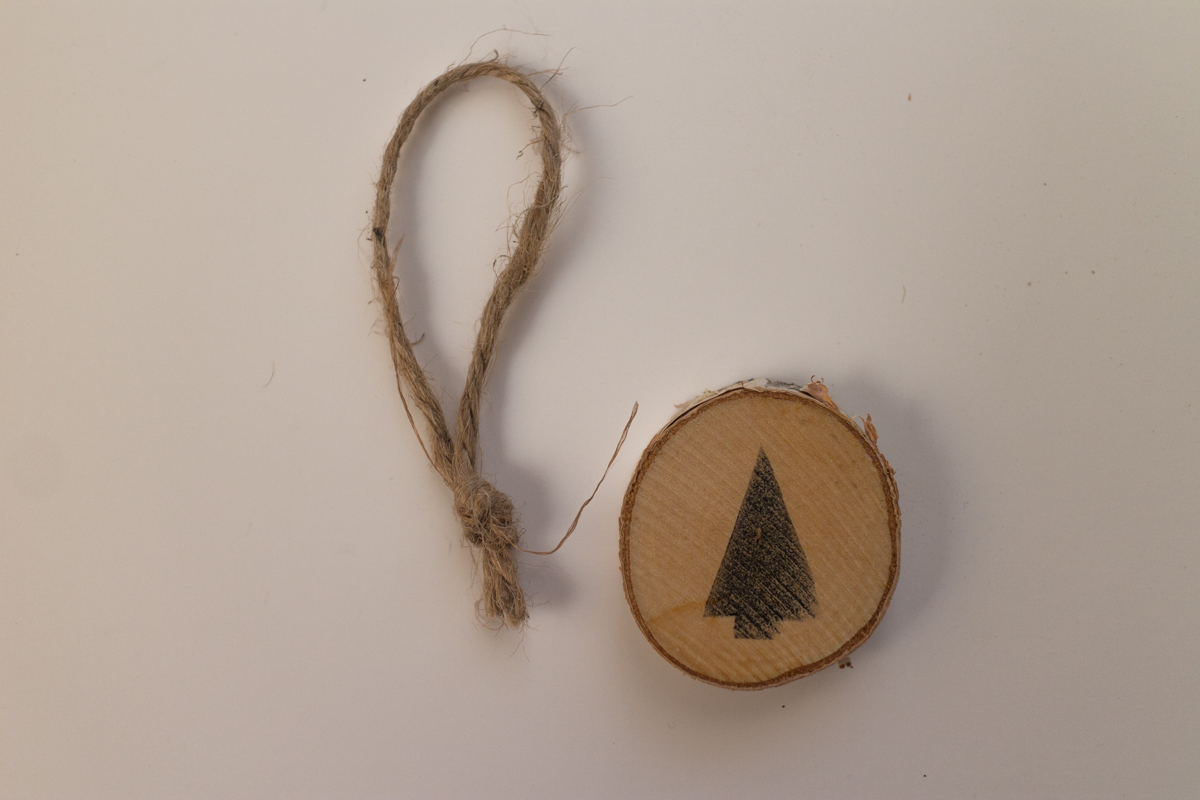
Pull it tight and snip the ends so they're nice and short. 

Hot glue time:

Hot glue your knot to the top of your birch disc. Apply a generous amount of glue so that the ornament does not fall off. This is especially important if you're using heavier discs than I have used!

Christmas ribbons and decorative bows would also be very cute ways to hang these little ornaments. See what you have on hand!

If you chose a colored ink for your stamps, I would stick with a neutral material to hang your wood discs. You don't want to go overboard with the festive colors!

Finish them:

Stamp, knot and glue your remaining birch chips. 

I purposely chose chips that had unique knots and flaws because I feel like it adds to the rustic, bohemian vibes that we're going for with this craft. 

These ornaments would make great gifts for your family and friends. They'll be a staple on their trees for years to come. 

Maybe even let your kids have a go at this insanely easy craft and see what they can come up with. Date the back of it when they're done so you'll be able to save that special moment forever!

This is just day one of my Christmas ornament takeover I'm having here on Bohemian Crossroads, so make sure you check in every day this week to see what else I'm coming up with! I'll be sharing quick, easy and inexpensive bohemian ornaments for you to try at home.

Make sure you subscribe below or in the NEWSLETTER tab above so you don't miss out on the ornament week takeover!

How to Save Money on Gifts for the Holidays

The holidays can be a stressful time for most of us. We're all pretty well aware that a bigger chunk than normal will vanish from our bank accounts. 

I love giving, so I'm not completely upset about this. I tend to give throughout the year but Christmas is my time to go overboard and pour my heart and soul into thoughtful gifts for my family. Sadly, my paycheck quickly gives me a swift kick to the rear and reminds me that I am no millionaire. Womp womp.

Luckily, giving gifts doesn't necessarily mean you have to give your soul just to be able to afford things for your family and friends. I'm here to give you some quick tips to help us save some serious money this holiday season.

Browse before you buy.

You're in the store, surrounded by all the other holiday shoppers. You've found the perfect gift, for the perfect person. What do you do? Well in the heat of the moment you run to the registers, filled with joy that you can now cross that person off of your list of people to shop for. 

Let me tell you what you did wrong. You just fell victim to an impulse buy. Not your typical impulse buy where you get that shirt because it's so cute and you "can't live without it." This buy is entirely different. Because you're already so overwhelmed and the holidays chaos surrounding you is making your head spin, you grab what you want without even thinking of potentially getting a better deal. 

Well, thanks to stores like Amazon and eBay  you can price match right from your phone. So while you're in the midst of your "Oh crap should I buy this or not!?" moment, pull out your smart phone and do a quick price match. You can often save yourself dozens of dollars just by ordering the same product online.

These sites are the ones that I use most often but there really are so many. You can even type the product in mind right into Google and do a quick search that way. The internet is a very convenient thing, take advantage of it! Especially in times like these.

Coupon. Coupon. Coupon.

Just because you're buying something as a gift, does not mean you need to pay full price for it.  Why would you pay full price if you have that coupon hidden in your email or your weekly newspaper? You'd be a ding dong NOT to!

Worried someone is going to think you're cheap? Well, surprise! No one knows you used a coupon. You don't need to tell anybody. Heck, I brag about the good deals I get when I use coupons! They're made to save you money regardless of who you're spending money on. Don't be scared!

Weekly ads are your friends.

Most of the stores have been sending out their holiday ads for weeks now. They boast about the great deals they're having on pretty much all of their merch. Now's the time for you to stock up! Get all of the gifts that you can while things are on sale. 

Have a gift idea in mind? Check the holiday ads or the store's website. Maybe they're having a great sale on the item. If they're not, check back in another week and see what they have this time around.

Obviously this tip will only get you so far. You can't be shopping on Christmas Eve when things are picked over, expecting to get a great deal. Well, I guess you can. I just wouldn't trust putting your shopping off THAT last minute!

Amazon Prime is a lifesaver.

Where would I be without my Amazon Prime? I tend to do most of my holiday shopping online, so this is a huge lifesaver for me. 

Amazon Prime gives you great deals on great products, all while having FREE SHIPPING! Oh yeah, I said it. Most products on Amazon team up with the Prime benefits and offer free 2-day shipping. No minimum! 

I signed up for Prime a few months ago and it already has saved me a large chunk of money in shipping. I'm forever grateful to the genius that came up with this. 

As someone who purchases things from Amazon year round, this has really been worth it for me. I have already saved more money by having free shipping than I pay for my annual subscription.

A year subscription to Amazon Prime costs $99. If you would like to take advantage of the FREE 2-day shipping by signing up for Amazon Prime you can sign up for a free 30 day trial by clicking here.

Shop well known shopping "holidays".

Obviously black Friday is over, but cyber Monday is here! Take serious advantage of these deals from the comfort of your own home. No makeup? No shoes? No problem. Cyber Monday is meant for people like us!

Other shopping holidays will pop up between now and Christmas. Some stores even have their own special events. So make sure you're signed up for the newsletters of your favorite stores so you get their deals and specials!

A lot of stores have deals leading up to Christmas day even, so make sure you're on top of your game!

Make a gift.

Are you a master crafter? Maybe you suck at crafts but are a master when it comes to Pinterest. 

Making a unique and thoughtful gift doesn't have to be difficult. Thanks to Pinterest and all of the helpful crafty blogs out there you can have the perfect gift made in a very small amount of time.

Some of my favorite gifts to make include:

  • Scrapbooks containing awesome old pics of family and friends.
  • "Care packages" containing homemade candles and sugar scrubs.
  • Baked goods, you can never go wrong with baked goods.

You don't have to be Martha Stewart to get your craft on. Just check out Pinterest and you'll be a gift making beast! Follow me on Pinterest here to see what I'll be making this season! :)

Thrift a gift.

No, do not get your family some old, worn out, stinky sneakers. Unless they're into that kinda' thing?

Thrifting a gift does not have to be frowned upon. It would be extremely affordable and unique. Maybe you found some old decor at a thrift store. Fix that bad boy up, throw a coat of paint on it and you've just combined the last step with this step!

Sometimes it's easier and more affordable to buy second hand. And that is totally okay. Giving gifts is greatly based around the thought that goes into it. If your gift is from your heart and has the best of intentions, then the receiver will love it regardless of where it's from or how much it costs.

What did we learn?

Giving gifts for the holidays does not have to break the bank. You can still budget and have an affordable holiday season without skipping meals trying to afford it. 

Be aware of the price tag and know your options. The first pick isn't always the best pick. The first price isn't always the best price for your wallet. Know your budget but don't be afraid to go all out for your family.

Give from your heart. Give with good intentions. 

If you found any of these tips helpful, please subscribe below so you can be notified when I post fun, new things!

DIY Stamps From Dollar Store Erasers

Most of us have those little pink erasers laying somewhere around our homes. (Don't pretend like I'm alone on this one!) Whether you're in school, working or have kids of your own, chances are you're with me on this. 

I've kept a lot of little erasers laying around for who knows what reason. I don't even really use pencils much anymore so these little erasers are becoming less and less relevant to my daily activities. 

Luckily, I have a tendency to find multiple purposes for most of my belongings. I hate calling things "irrelevant" so I choose to repurpose them and give them relevance again!

Gather your little erasers because today they're getting promoted in their purpose! I'm going to show you how to take your old, dirty erasers and turn them into new fun stamps!

You're not going to want to miss this, they're perfect for the upcoming holidays!

Here's what you'll need:

  • An eraser. I bought this new one from the dollar store because I'm fancy! But just use whatever old erasers you have laying around your house!
  • An x-acto knife or some sort of knife to carve out your designs. 
  • An ink pad.
  • Extras I ended up using but are not pictured: Birch blocks, hot glue and a sharpie.

Getting started:

Since I had a pretty large eraser, I went ahead and cut it into smaller pieces about an inch wide. Your x-acto knife should cut right through the eraser, making this relatively easy. Since I will be making shapes out of these smaller bits, I didn't worry too much about cutting straight lines.

My big eraser yielded four sections. I decided to cut my smaller parts again, this time in half to make them thinner. This will make it easier to cut precise edges when I'm read to form my shapes.

If you have the standard pink school erasers, you might want to consider cutting a centimeter or two off of the thickness. This really helps to keep your lines precise when you're cutting out your shape!

Before you cut:

I strongly recommend drawing out your shapes and designs with a sharpie or some other marker before you actually cut them out. This way you're going into it with a plan and not having to freehand the entire thing.

I am so glad I chose to draw my shapes out first. I know this project would have been an epic fail if I hadn't. As you can see the four designs I chose were a tree, a house, an arrow and an acorn. The possibilities are endless with your designs! Clearly I am no drawing expert, but the "2nd grade drawing" vibes my designs give off made me happy in the end. Sometimes imperfection leads to the most unique end result. 

If your shapes are pretty simple, like circles and squares, go ahead and skip this drawing step.

Creating the stamp:

Now it's time to cut out your shapes using your knife. Take your time and don't rush through this step. You want to make sure your lines are precise. This is why drawing a shape beforehand really comes in handy. It will act as a guideline so you can see where you're cutting.

Rounded edges are the hardest to cut accurately, so really make sure you take your time on these parts especially.

For my house design, I dug small bits out of the windows. I didn't have to cut all the way through because I knew that carving out a small indent where I wanted the windows to be would create the negative space I was looking for when it came to stamping.

The more detail your design has, the more time, effort and caution you will need to take while cutting it out. Simple designs are way easier to do for this project, especially if it's your first time. 

Try to stick with straight, solid lines and minimal detail. Unless you're feeling crazy, then just go for it!

Added bonus:

I originally planned to keep my stamp just the way it was but decided in the end to add an extra finishing touch. 

I have these birch discs that I plan to use for an upcoming project. I glued the stamp to the disc for added support when I'm using the stamp. This way there's even pressure and the stamp is easier to use. 

If you don't have any discs like this on hand, try using small bits of cardboard from old boxes. It's cheap, easy and get's the job done just as well!

Stamp your heart out:

IMG_3040.jpg

I'm so happy with how my little stamps turned out. They're cute and imperfect and I love it. These can be used for so many different projects for years to come. They're perfect for invitations, scrapbooking, holiday decor and much much more. Make sure you check back in two weeks to see what I ended up using these little stamps for. Hint: My Christmas tree appreciated it!

Make sure:

To subscribe below or in the NEWSLETTER tab above so that you are updated whenever I post a fun, new diy project. 

Also- The second week of December I will be doing a Christmas ornament takeover, so make sure you subscribe so you don't miss out on that!

I hope you loved this tutorial and found it useful. I will talk to you again next week!