Urban Outfitters Style Pom Pom Wall Decor
I love Urban Outfitters. They've got the cutest clothes, shoes and even home decor. Unfortunately when you're on a budget, Urban isn't always in your price range. Seeing as I'm turning into a home decor freak lately, I'm on the hunt for cute home decor - CHEAP! Sometimes the best way to get things done inexpensively is to just do it yourself.

That's what I did in today's DIY. I found a piece at Urban Outfitters that would have looked so awesome on my wall, but didn't want to pay the $50 price tag that came along with it. So today I'm going to show you how to make a look-a-like for under $10! Woo woo.
Here's what you'll need:

- Yarn for the pom poms
- Scissors
- A twig or dowel
Getting Started:


Start by wrapping any color yarn around three fingers (your pointer finger, middle and ring). Use your thumb to hold the yarn in place when you first start wrapping, this will really help! Do not wrap the yarn around too tight otherwise you will cut off circulation to your fingers. No one wants that to happen.
Changing Colors:

Since we want the pom poms to have multiple colors of yarn, snip the first color off and use the above technique to start wrapping the second color. Put your next color right on top of the first color. The more yarn you use, the fluffier your pom pom will be in the end. We like fluffy poms!
Finishing Your Pom Pom:


When you have reached your desired thickness cut off about a foot of any color of yarn. With your palm facing up stick it in between your pointer and middle finger towards the top of your hand. You can use a pen to help push the yarn through.
Now What:


Once you have the string in between your fingers, wrap it around the back of the yarn ball on your fingers. Pull it through the top part of your pointer and middle fingers.
Give It A Knot:
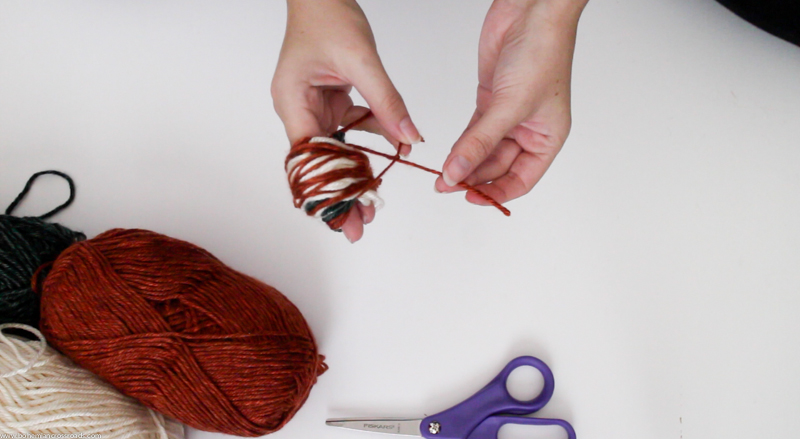
Tie the yarn piece in a single knot but loop the yarn through twice. Do not double knot it yet, you need to make it tighter once you get it off of your fingers. Pull the string a little tighter (not too tight).
Removing The Pom:

Slowly and carefully start removing the pom pom from your fingers. Once you have it off, tighten the yarn and double knot it. I triple knotted it for added security!
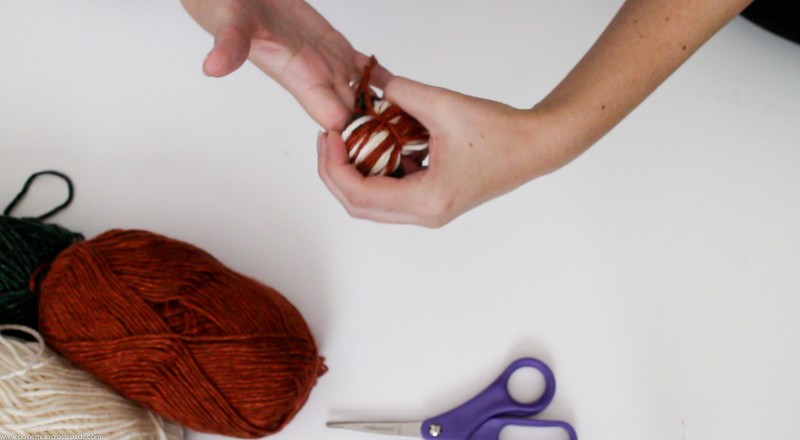
Creating The Actual Pom Pom:


Wiggle your scissors into every loop and slowly start cutting away! If you miss some loops, it's okay! We can always get those ones after. Repeat on both sides of the pom pom. After you cut both sides, give it a little hair cut in case any are too long. Don't forget to cut any loops that you missed!
Next Step:

Repeat the above process until you have your desired amount of yarn pom poms. I made 14 total. Get your twig, scissors and white yarn together and let's move onto the next step.
Preparing Your Twig:

Seeing as I wanted to focus the pom poms in the curvature of the stick, I tied 5 long strands of white yarn to the twig. Depending on the size of your twig or dowel, the number of strands you choose will vary.
Attaching The Pom Poms:

Once you have your long pieces of white (or what ever color yarn) attached, tie a double knot around each individual pom pom. I laid my pom poms out beforehand so I knew where I wanted each one to fall.
You should end up with something similar to this:
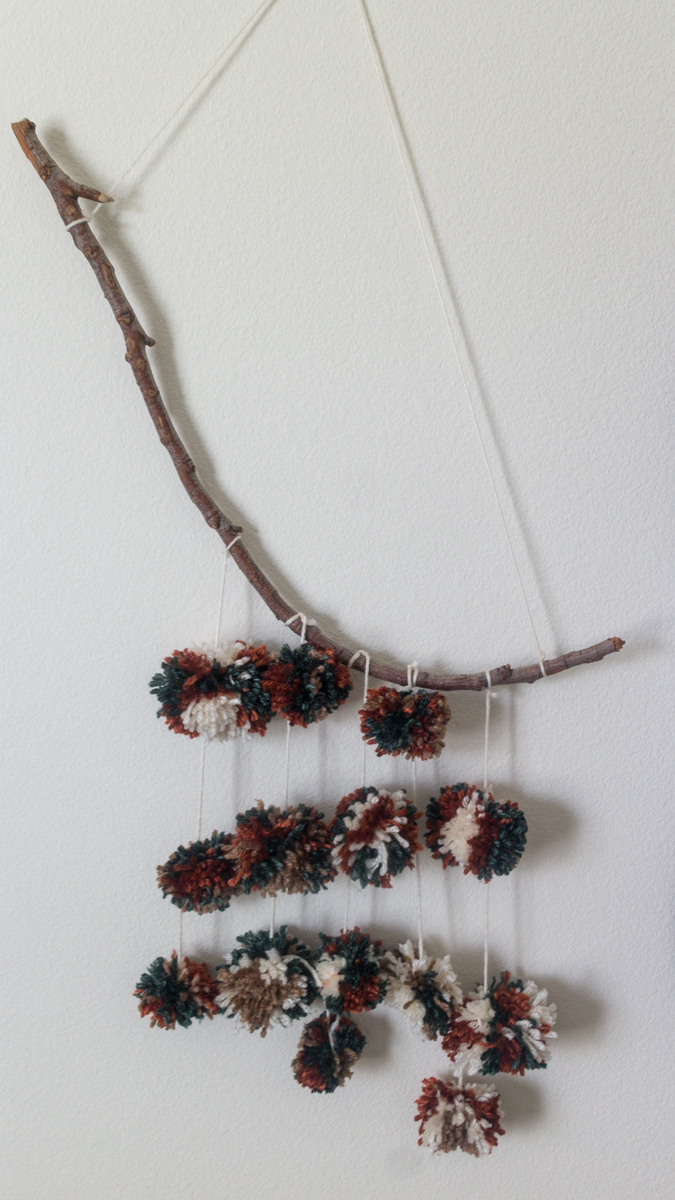
This is such a cute home decor item, I love it. The one's similar to this sell on Urban Outfitters for about $50. This one you made with your very own hands. That should make it cool enough! And you saved about $40, score!
I hope you enjoyed this tutorial and found it helpful! Make sure to let me know in the comments below if you decide to make your own!