
Easy DIY Wood Crate Shelf
Shelving can be a major eye sore. Usually they are big and bulky and don't really "fit in" with anyones home decor. Since I've been working on redesigning my bathroom, I decided I wanted a cute shelf to hang above my towel rack. Instead of going out and getting yet another ugly shelf, I decided to make one myself out of a crate. They're cheap, adorable and can be customized however the heck I want it! (Not to mention they totally match the decor of my home. )
So today I'm going to show you how to take a plain crate and turn it into the most boho/country shelf your eyes have ever seen. As always if you prefer less pictures and more talk, I'll have a condensed version of the tutorial at the bottom of the page, Let's get started!
Here's what you'll need:

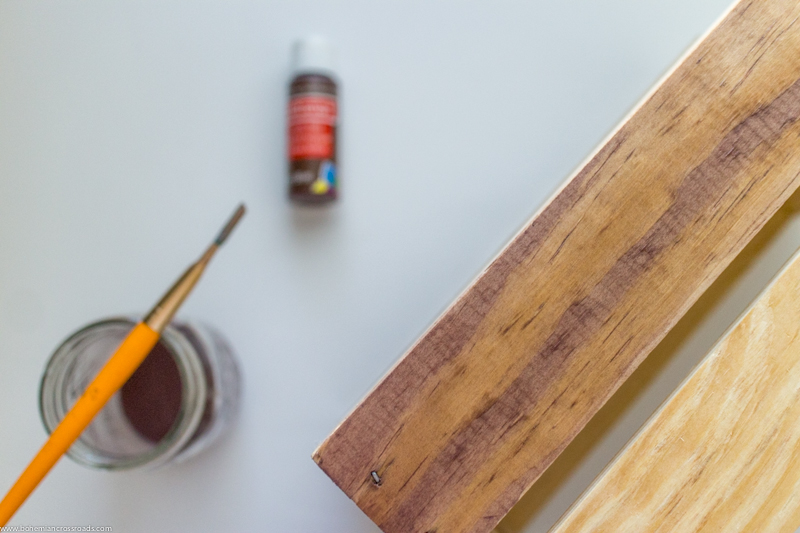
- A crate. I got mine from Michaels, but they have some on Amazon for super cheap!
- Brown paint. I went with chocolate brown, but you can choose one that makes you jolly.
- Paint for the back part of the crate. I have blue pictured, I later changed my mind and used "cranberry wine." Ooooh!
- A paint brush (or two). I don't mind rinsing and reusing my brushes, but if you're trying to get the job done quick - bust out two brushes!
- Lastly, a bowl (I used a mason jar) to put the water and paint mixture we're going to make in.
Now for the fun part-
Create your paint and water mix!

I'm going to be 100% honest right now - I hate measuring, especially during projects like this. But what you're going to want to do is create a mix of the paint and water. I added about 2 tablespoons of the brown paint to roughly two thirds of a cup of water. The exact measurements don't really matter, you just want to create a mix that isn't too runny but all the paint is completely dissolved into the water. Stir with the paintbrush until your mix looks like a watered down version of chocolate milk. (I'm better with fun descriptions than I am with measurements.)
When you lift your paint brush out of the mixture, your brush should have quite a bit of brown on it. If it is just wet and you can't see much pigment, add more paint! We're mixing the paint with water so that it acts like a stain. If we put straight paint on the crate, it would cover all the beautiful grain in the wood.
If you would prefer to buy a legitimate wood stain, go for it! This is just more in my price range, doesn't give me a headache and is a lot easier and less messy to work with. Plus, it's fun to pretend like you're a scientist cookin' up something cool...really it's just paint water.
Apply the mixture to your crate.

I suggest putting some newspapers or a trash bag below your project space. When you're just getting used to handling the mix, things can get messy! Don't get too much of the mixture on the paint brush and be sure to wiggle some of it off before you apply. Because it acts as more of a stain, it will not give a completely opaque coverage. It is going to take several coats to get a warm finish like mine has. This is one of the parts that you can definitely customize to your wants. If you like the super sheer coverage, leave it at one or two coats. I used four to get mine as dark as it is. I could've gone darker, but I painted until my crate was a color that felt right.
Only paint the outside of the crate along with the inside edges. Do not paint the back part of the crate (on the inside.) We are leaving that it's natural wood color so that we can paint it an accent color when we are finished with the brown. If you want to veer off and do your own color scheme at this point, not a prob!


This is my crate after four layers of the stain. I waited about 5 minutes in between coats. Just let one side dry while you're painting another. If a side feels too wet when you go to put another coat, let it sit for a few minutes and you'll be good to go!
Do not worry if you get a little paint on the back panel, when you put your accent color on you won't be able to see any oopsies.
Quick tip!

The inside of most crates usually have a more rough texture. Because of this, the paint mix may react differently when applied to the wood. I noticed I had to use quite a bit more paint on the inside of the crate versus the outside and edges.
Also, how awesome is that big knot on the side. Another reason I love this paint mix is because it doesn't cover the knots in the wood. It really enhances them!
Add your accent color.

In my "supplies" picture I have listed a very cool blue color. Well, extremely last minute I changed my mind and decided on this beautiful cranberry wine color. It's so bold and pretty, I'm very glad I decided to go with this one!
This parts easy. Just put straight paint onto the remaining unpainted wood. This should only take one coat of paint. My original idea was to paint the entire inside of the crate this color, but I liked the idea of just the back plate being this bold.
Let dry & Style!


Above I have the shelf styled with a small decorative fall flower, a cute little tea candle and a bohemian wood slice clock (which you can find the tutorial for here.) This is, by far, the cutest shelf I have in my home now. I absolutely adore it and I hope that you do to!
Condensed Tutorial.
- Mix roughly 2 tablespoons of paint with 2/3 cup water. Measurement does NOT need to be exact. You just want a mix that isn't too runny but has all the paint dissolved completely. (Imagine a similar consistency to adding a lil water to your chocolate milk!)
- With some newspapers or some sort of protective barrier between your project and your workspace, begin painting the outside of the crate.
- Since it takes about 5 minutes for each coat to dry, just continue working your way around the crate. The part you started with should be dry by the time you have completed the exterior of the crate. (I used about 4 coats, but this really depends on how rich of a brown you want your end product to be.)
- Work your way towards the inside of the crate, making sure to leave the back part of the interior of the crate blank. We are going to paint this part an accent color so do not paint it!
- Do not panic if you get a little bit of paint on the blank part, the accent color paint will cover it right up.
- After you have 4 coats (or however many you chose) of the paint and water mixture on the crate, paint the back of the crate with the paint that you chose as an accent color. Do NOT mix this accent color with water unless you want a stain effect on the back part of the crate too. This should only take one coat of paint.
- Dry, style, hang & enjoy!
I hope you enjoyed this tutorial. If you did, make sure to subscribe below or in the NEWSLETTER tab above for weekly updates on my recent posts!